Step By Step of Configuring Oracle 11gR2 (11.2.0.1) RAC to RAC Dataguard:
(or)
http://shivanandarao-oracle.com/2013/11/03/create-rac-standby-database-for-rac-primary-database/

Copy the Password File from Primary to all the nodes in Standby.
Create required dump file directories for the Standby Instances
Connect to the asmcmd as a grid Operating System user and create the below directories.


(or)
http://shivanandarao-oracle.com/2013/11/03/create-rac-standby-database-for-rac-primary-database/
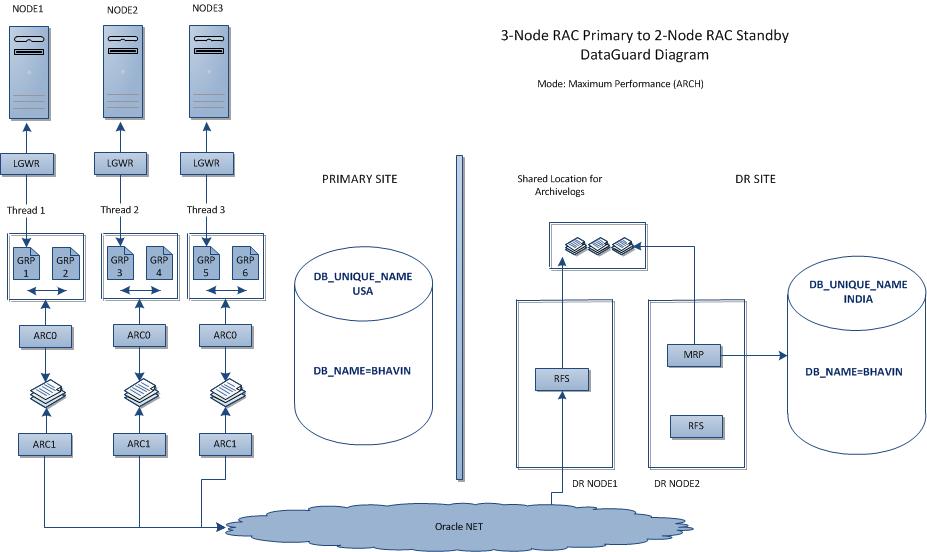
This document explains the step by step process of building the 11g R2 (11.2.0.1) 3-Node RAC primary to 2-Node RAC Physical Standby DataGuard on Oracle Enterprise Linux
Technical Architecture of 11g R2 RAC primary to RAC standby DataGuard Configuration:
PRIMARY
|
STANDBY
| |
Clusterware
|
11g R2 Grid Infrastructure (11.2.0.1)
|
11g R2 Grid Infrastructure (11.2.0.1)
|
Cluster Nodes
|
node1, node2, node3 (3-node RAC)
|
dr-node1, dr-node2 (2-node RAC)
|
SCAN
|
lab-scan.hingu.net
|
dr-lab-scan.hingu.net
|
SCAN listener Host/port
|
SCAN VIPs (port 1525)
|
SCAN VIPs (port 1525)
|
VIPs
|
node1-vip, node2-vip, node3-vip
|
dr-node1-vip, dr-node2-vip
|
DB_UNIQUE_NAME
|
USA
|
INDIA
|
DB_NAME
|
BHAVIN
|
BHAVIN
|
DB Instances
|
bhavin1, bhavin2, bhavin3
|
bhavin1, bhavin2
|
DB LISTENER
|
BHAVIN_LISTENER
|
BHAVIN_LISTENER
|
DB Listener Host/port
|
node1-vip, node2-vip, node3-vip (port 1530)
|
dr-node1-vip, dr-node2-vip (port 1530)
|
DB STORAGE
|
ASM
|
ASM
|
File Management
|
OMF
|
OMF
|
ASM diskgroup for DB files
|
DATA
|
DATA
|
ASM Diskgroup for Recovery Files
|
FRA
|
FRA
|
ORACLE_HOME
|
/u01/app/oracle/db11201
|
/u01/app/oracle/db11201
|
11g R2 RAC version
|
11.2.0.1
|
11.2.0.1
|
OS
|
Oracle Enterprise Linux 5.5 (32 bit)
|
Oracle Enterprise Linux 5.5 (32 bit)
|
Existing Setup (Before the Dataguard Setup):
It is assumed that preliminary requirement to configure RAC to RAC 11g R2 Dataguard has been established. Here are the screenshots for the existing Setup of Primary as well as Standby site.
PRIMARY Site:
· 3-node 11g R2 Grid Infrastructure (11.2.0.1) has been installed and configured.
· 3-node RAC software (11.2.0.1) has been installed and configured.
· ASM diskgroup DATA and FRA has been created.
· Database “BHAVIN” is created on ASM and configured to use OMFs.
· DB listener BHAVIN_LISTENER has been created and running on port 1530.
· Database Instances are configured with LOCAL_LISTENER and REMOTE_LISTENER parameters.
DR Site:
· 2-node 11g R2 Grid Infrastructure (11.2.0.1) has been installed and configured.
· 2-node RAC software (11.2.0.1) has been installed and configured.
· ASM diskgroup DATA and FRA has been created.
· DB listener BHAVIN_LISTENER has been created and running on port 1530.
Click here for the detail information on installing/configuring 11g R2 Grid Infrastructure, Installing 11g R2 RAC, creating LISTENERs and creating a RAC database on ASM.
RAC to RAC Physical Dataguard:
· Enable Force Logging.
· Modify init Parameters.
· Enable Archivelog Mode.
· Create the SLRs (Standby Redo Logs).
· Backup the Database for Standby
· Create pfile for standby database.
· Update the tnsnames.ora.
Enable Force Logging:
alter database force logging;
Modify Dataguard related init Parameters:
DB_NAME=BHAVIN
DB_UNIQUE_NAME=USA
LOG_ARCHIVE_CONFIG='DG_CONFIG=(USA,INDIA)'
LOG_ARCHIVE_DEST_1='LOCATION=USE_DB_RECOVERY_FILE_DEST VALID_FOR=(ALL_LOGFILES,ALL_ROLES) DB_UNIQUE_NAME=USA'
LOG_ARCHIVE_DEST_2='SERVICE=INDIA ARCH VALID_FOR=(ONLINE_LOGFILES,PRIMARY_ROLE) DB_UNIQUE_NAME=INDIA'
LOG_ARCHIVE_DEST_STATE_1=ENABLE
LOG_ARCHIVE_DEST_STATE_2=ENABLE
REMOTE_LOGIN_PASSWORDFILE=EXCLUSIVE
LOG_ARCHIVE_FORMAT=%t_%s_%r.arc
LOG_ARCHIVE_MAX_PROCESSES=8
FAL_SERVER=INDIA
DB_FILE_NAME_CONVERT='INDIA','USA'
LOG_FILE_NAME_CONVERT= 'INDIA','USA'
STANDBY_FILE_MANAGEMENT=AUTO
The db_unique_name parameter has already been set to the appropriate value during the initial creation of the RAC database. The log_archive_dest_state_n and remote_login_passwordfile have default values set to ENABLE and EXCLUSIVE respectively. So, only below mentioned parameter needed to be changed here.
alter system set LOG_ARCHIVE_CONFIG='DG_CONFIG=(USA,INDIA)' scope=both sid='*';
alter system set LOG_ARCHIVE_DEST_1='LOCATION=USE_DB_RECOVERY_FILE_DEST VALID_FOR=(ALL_LOGFILES,ALL_ROLES) DB_UNIQUE_NAME=USA' scope=both sid='*';
alter system set LOG_ARCHIVE_DEST_2='SERVICE=INDIA ARCH VALID_FOR=(ONLINE_LOGFILES,PRIMARY_ROLE) DB_UNIQUE_NAME=INDIA' scope=both sid='*';
alter system set log_archive_format='%t_%s_%r.arc' scope=spfile sid='*';
alter system set log_archive_max_processes=8 scope=both sid='*';
alter system set fal_server=INDIA scope=both sid='*';
alter system set db_file_name_convert='INDIA','USA' scope=spfile sid='*';
alter system set log_file_name_convert='INDIA','USA' scope=spfile sid='*';
alter system set standby_file_management=AUTO scope=both sid='*';
Verify that the values are set correctly for these parameters after bouncing the database.
set linesize 500 pages 0
col value for a90
col name for a50
select name, value
from v$parameter
where name in ('db_name','db_unique_name','log_archive_config', 'log_archive_dest_1','log_archive_dest_2',
'log_archive_dest_state_1','log_archive_dest_state_2', 'remote_login_passwordfile',
'log_archive_format','log_archive_max_processes','fal_server','db_file_name_convert',
'log_file_name_convert', 'standby_file_management')
Enable Archivelog Mode:
srvctl stop database –d usa
startup mount (only one instance)
alter database archivelog
alter database open
srvctl start database –d usa ß This will start the remaining Instances on the cluster.
Create the Standby Redo Logs (SRLs) on Primary and Standby:
There should be minimum of (threads)*(groups Per Threads + 1) SLRs created on the standby database. There are 3 threads with 2 groups per thread in this configuration on the primary side so there should be total of 9 SLRs at minimum needs to be created. Let’s get the total Groups and Max size of the logfile from v$log.
There should be minimum of (threads)*(groups Per Threads + 1) SLRs created on the standby database. There are 3 threads with 2 groups per thread in this configuration on the primary side so there should be total of 9 SLRs at minimum needs to be created. Let’s get the total Groups and Max size of the logfile from v$log.
SQL> select max (bytes), count (1) from v$log;
MAX(BYTES) COUNT(1)
---------- ----------
52428800 6
Here, the total no. of online redo groups are 6 and the maximum size of these groups is 52M. So, 3 Standby Redo Log groups per thread with size of 52M each should be created on Primary as well as standby database.
ASMCMD> mkdir +fra/usa/STANDBYLOG ß (connected as grid user using asmcmd)
alter system set standby_file_management=manual scope=both sid='*';
alter database add standby logfile thread 1 group 7 '+fra/usa/standbylog/standby_group_07.log' size 52M;
alter database add standby logfile thread 1 group 8 '+fra/usa/standbylog/standby_group_07.log' size 52M;
alter database add standby logfile thread 1 group 9 '+fra/usa/standbylog/standby_group_07.log' size 52M;
alter database add standby logfile thread 2 group 10 '+fra/usa/standbylog/standby_group_10.log' size 52M;
alter database add standby logfile thread 2 group 11 '+fra/usa/standbylog/standby_group_11.log' size 52M;
alter database add standby logfile thread 2 group 12 '+fra/usa/standbylog/standby_group_12.log' size 52M;
alter database add standby logfile thread 3 group 13 '+fra/usa/standbylog/standby_group_13.log' size 52M;
alter database add standby logfile thread 3 group 14 '+fra/usa/standbylog/standby_group_14.log' size 52M;
alter database add standby logfile thread 3 group 15 '+fra/usa/standbylog/standby_group_15.log' size 52M;
alter system set standby_file_management=auto scope=both sid='*';
Backup The Primary Database For Standby.
Take the backup of the primary database and the standby controlfile. Create the staging directory to hold the RMAN backup.
Take the backup of the primary database and the standby controlfile. Create the staging directory to hold the RMAN backup.
mkdir /home/oracle/backup
rman target / nocatalog
run
{
sql "alter system switch logfile";
allocate channel ch1 type disk format '/home/oracle/backup/Primary_bkp_for_stndby_%U';
backup database;
backup current controlfile for standby;
sql "alter system archive log current";
}
Create pfile For Standby.
create pfile='pfile_for_standby.txt' from spfile;
Update TNSNAMES.ora
Add the tns alias for each of the instances of the primary database.
USA1 =
(DESCRIPTION =
(ADDRESS = (PROTOCOL = TCP)(HOST = node1-vip.hingu.net)(PORT = 1530))
(CONNECT_DATA =
(SERVER = DEDICATED)
(SERVICE_NAME = usa.hingu.net)
(SID = bhavin1)
)
)
USA2 =
(DESCRIPTION =
(ADDRESS = (PROTOCOL = TCP)(HOST = node2-vip.hingu.net)(PORT = 1530))
(CONNECT_DATA =
(SERVER = DEDICATED)
(SERVICE_NAME = usa.hingu.net)
(SID = bhavin2)
)
)
USA3 =
(DESCRIPTION =
(ADDRESS = (PROTOCOL = TCP)(HOST = node3-vip.hingu.net)(PORT = 1530))
(CONNECT_DATA =
(SERVER = DEDICATED)
(SERVICE_NAME = usa.hingu.net)
(SID = bhavin3)
)
)
Copy the tnsnames.ora on all the instances under $ORACLE_HOME/network/admin to keep the same tnsnames.ora on all the instances.
· Copy the RMAN backup and pfile_for_standby.txt.
· Copy the password file.
· Create required directories for Standby Instance.
· Modify the pfile.
· Copy the tnsnames.ora from Primary and add the TNS Alias for the standby database instances.
· Create the ASM directories under the DATA and FRA diskgroup.
Copy the RMAN Backup files and init.ora from Primary to Standby:
Copy the backups from primary node1 to dr-node1 under the same location as primary node1 (/home/oracle/backup). Also copy the pfile that was created for standby on primary node1 to the dr-node1.
scp $ORACLE_HOME/dbs/pfile_for_standby.txt dr-node1:$ORACLE_HOME/dbs/pfile_for_standby.txt
scp –r /home/oracle/backup dr-node1:/home/oracle
Copy the Password File from Primary to all the nodes in Standby.
Copy the file $ORACLE_HOME/dbs/orapwbhavin1 from Primary node 1 to both the standby nodes under the directory $ORACLE_HOME/dbs with the name of orapwbhavin1 and orapwbhavin2 for dr-node1 and dr-node2 respectively.
scp $ORACLE_HOME/dbs/orapwbhavin1 dr-node1:$ORACLE_HOME/dbs/orapwbhavin1
scp $ORACLE_HOME/dbs/orapwbhavin1 dr-node2:$ORACLE_HOME/dbs/orapwbhavin2
Create required dump file directories for the Standby Instances
On dr-node1:
mkdir –p /u01/app/oracle/admin/india/adump
mkdir –p /u01/app/oracle/diag/rdbms/india/bhavin1
cd /u01/app/oracle/diag/rdbms/india/bhavin1
mkdir trace cdump
On dr-node2:
mkdir –p /u01/app/oracle/admin/india/adump
mkdir –p /u01/app/oracle/diag/rdbms/india/bhavin2
cd /u01/app/oracle/diag/rdbms/india/bhavin2
mkdir trace cdump
Modify pfile_for_standby.txt file (under $ORACLE_HOME/dbs)
The one’s in RED color are modified for the standby database. The rest of the parameters remain same on both the primary and standby.
The one’s in RED color are modified for the standby database. The rest of the parameters remain same on both the primary and standby.
*.audit_file_dest='/u01/app/oracle/admin/india/adump'
*.audit_trail='db'
*.cluster_database=true
*.compatible='11.2.0.0.0'
*.control_files='+DATA/india/controlfile/control01.ctl','+FRA/india/controlfile/control02.ctl'
*.db_block_size=8192
*.db_create_file_dest='+DATA'
*.db_create_online_log_dest_1='+DATA'
*.db_create_online_log_dest_2='+FRA'
*.db_domain='hingu.net'
*.db_file_name_convert='USA','INDIA'
*.db_name='bhavin'
*.db_recovery_file_dest='+FRA'
*.db_recovery_file_dest_size=4039114752
*.db_unique_name='india'
*.diagnostic_dest='/u01/app/oracle'
*.dispatchers='(PROTOCOL=TCP) (SERVICE=bhavinXDB)'
*.fal_server='USA'
bhavin1.instance_number=1
bhavin2.instance_number=2
bhavin1.local_listener='LISTENER_BHAVIN1'
bhavin2.local_listener='LISTENER_BHAVIN2'
*.log_archive_config='DG_CONFIG=(USA,INDIA)'
*.log_archive_dest_1='LOCATION=USE_DB_RECOVERY_FILE_DEST VALID_FOR=(ALL_LOGFILES,ALL_ROLES) DB_UNIQUE_NAME=INDIA'
*.log_archive_dest_2='SERVICE=USA ARCH VALID_FOR=(ONLINE_LOGFILES,PRIMARY_ROLE) DB_UNIQUE_NAME=USA'
*.log_archive_format='%t_%s_%r.arc'
*.log_archive_max_processes=8
*.log_file_name_convert='USA','INDIA'
*.memory_target=1484783616
*.open_cursors=300
*.processes=1024
*.remote_listener='dr-lab-scan.hingu.net:1525'
*.remote_login_passwordfile='exclusive'
*.service_names='INDIA','india.hingu.net'
*.sessions=1131
*.standby_file_management='AUTO'
bhavin2.thread=2
bhavin1.thread=1
bhavin1.undo_tablespace='UNDOTBS1'
bhavin2.undo_tablespace='UNDOTBS2'
Copy the tnsnames.ora file from primary (under $ORACLE_HOME/network/admin)
From primary node1:
scp $ORACLE_HOME/network/admin/tnsnames.ora dr-node1:$ORACLE_HOME/network/admin/tnsnames.ora
scp $ORACLE_HOME/network/admin/tnsnames.ora dr-node2:$ORACLE_HOME/network/admin/tnsnames.ora
Now, Modify the LOCAL_LISTENER parameters in the tnsnames.ora to reflect the dr specific vip host names (On the Standby Nodes only).
LISTENER_BHAVIN1=(DESCRIPTION =(ADDRESS = (PROTOCOL = TCP)(HOST = dr-node1-vip.hingu.net)(PORT = 1530)))
LISTENER_BHAVIN2=(DESCRIPTION =(ADDRESS = (PROTOCOL = TCP)(HOST = dr-node2-vip.hingu.net)(PORT = 1530)))
Create the ASM directories
Connect to the asmcmd as a grid Operating System user and create the below directories.
ASMCMD> mkdir data/INDIA
ASMCMD> cd data/india
ASMCMD> mkdir PARAMETERFILE DATAFILE CONTROLFILE TEMPFILE ONLINELOG
ASMCMD> mkdir fra/INDIA
ASMCMD> cd fra/india
ASMCMD> mkdir ARCHIVELOG CONTROLFILE ONLINELOG STANDBYLOG
· Start the Instance in NOMOUNT using the pfile_for_standby.txt.
· Restore the Standby Database using RMAN DUPLICATE command.
· Create the Online Redo logs and Standby redo logs.
· Modify the TNSNAMES.ORA of Standby to add the Standby Database’s TNS alias.
· Modify the TNSNAMES.ORA of Primary to add the Standby Database’s TNS alias.
· Start the Managed Recovery Process
· Create the spfile and start the database on both the nodes using spfile.
· Register the New Standby database to the OCR.
· Start the Active Dataguard.
Start the Instance in NOMOUNT state:
Connect to the dr-node1 as oracle user and start the Instance bhavin1 using the $ORACLE_HOME/dbs/pfile_for_standby.txt parameter file.
export ORACLE_SID=bhavin1
export ORACLE_BASE=/u01/app/oracle
export ORACLE_HOME=/u01/app/oracle/db11201
export PATH=$PATH:$ORACLE_HOME/bin:.
sqlplus / as sysdba
startup nomount pfile=$ORACLE_HOME/dbs/pfile_for_standby.txt
Restore the RMAN backup using DUPLICATE DATABASE option:
Connect to the Target database (USA) and auxiliary instance (INDIA) from dr-node1 host to start the DUPLICATE.
rman target sys/oracle@usa1 auxiliary /
DUPLICATE TARGET DATABASE FOR STANDBY NOFILENAMECHECK;
Modify tnsnames.ora on Standby:
Existing tnsnames.ora does not contain the TNS alias of the standby database. It only contains TNS aliases for the Primary database because this tnsnames.ora was copied over from primary. Add the below TNS alias for standby database/instances into the tnsnames.ora file on both the standby hosts.
INDIA =
(DESCRIPTION =
(ADDRESS = (PROTOCOL = TCP)(HOST = dr-lab-scan.hingu.net)(PORT = 1525))
(CONNECT_DATA =
(SERVER = DEDICATED)
(SERVICE_NAME = india.hingu.net)
)
)
INDIA1 =
(DESCRIPTION =
(ADDRESS = (PROTOCOL = TCP)(HOST = dr-node1-vip.hingu.net)(PORT = 1530))
(CONNECT_DATA =
(SERVER = DEDICATED)
(SERVICE_NAME = india.hingu.net)
(SID = bhavin1)
)
)
INDIA2 =
(DESCRIPTION =
(ADDRESS = (PROTOCOL = TCP)(HOST = dr-node2-vip.hingu.net)(PORT = 1530))
(CONNECT_DATA =
(SERVER = DEDICATED)
(SERVICE_NAME = india.hingu.net)
(SID = bhavin2)
)
)
Modify tnsnames.ora on Primary:
Add the below TNS alias for standby database/instances into the tnsnames.ora file on all the primary hosts.
INDIA =
(DESCRIPTION =
(ADDRESS = (PROTOCOL = TCP)(HOST = dr-lab-scan.hingu.net)(PORT = 1525))
(CONNECT_DATA =
(SERVER = DEDICATED)
(SERVICE_NAME = india.hingu.net)
)
)
INDIA1 =
(DESCRIPTION =
(ADDRESS = (PROTOCOL = TCP)(HOST = dr-node1-vip.hingu.net)(PORT = 1530))
(CONNECT_DATA =
(SERVER = DEDICATED)
(SERVICE_NAME = india.hingu.net)
(SID = bhavin1)
)
)
INDIA2 =
(DESCRIPTION =
(ADDRESS = (PROTOCOL = TCP)(HOST = dr-node2-vip.hingu.net)(PORT = 1530))
(CONNECT_DATA =
(SERVER = DEDICATED)
(SERVICE_NAME = india.hingu.net)
(SID = bhavin2)
)
)
Start the Managed Recovery Process:
Start the Managed recovery process on dr-node1 and verify that the log transport and log application is happening. Alert log is a quick and easy way to see if things log transport/Gap resolution and log application is working as expected. Start the tail –f on alert logs on both the standby nodes before starting the MRP.
ALTER DATABASE RECOVER MANAGED STANDBY DATABASE DISCONNECT FROM SESSION;
Perform the log switch on the primary database so initiate the log Transport.
alter system switch logfile
Similar information can be verified by running below SQLs on standby database.
select * from v$archive_gap;
select process, client_process, sequence#, status from v$managed_standby;
select sequence#, first_time, next_time, applied from v$archived_log;
select archived_thread#, archived_seq#, applied_thread#, applied_seq# from v$archive_dest_status;
select thread#, max (sequence#) from v$log_history group by thread#;
select thread#, max (sequence#) from v$archived_log where APPLIED='YES' group by thread#;
Create spfile from pfile:
create spfile='+data/india/parameterfile/spfileINDIA.ora' from pfile='/u01/app/oracle/db11201/dbs/pfile_for_standby.txt';
After creating the spfile, create the below init.ora files under $ORACLE_HOME/dbs on both the dr nodes with the spfile entry so that the instance can start with the newly created spfile.
On dr-node1:
[oracle@dr-node1 dbs]$ cat initbhavin1.ora
spfile='+data/india/parameterfile/spfileINDIA.ora'
On dr-node2:
[oracle@dr-node1 dbs]$ cat initbhavin2.ora
spfile='+data/india/parameterfile/spfileINDIA.ora'
Add Standby database and Instances to the OCR:
Add the standby database and its instances to the OCR so that it is managed by CRS.
srvctl add database -d india -n bhavin -o /u01/app/oracle/db11201 -m hingu.net -p +data/india/parameterfile/spfileindia.ora -r physical_standby -a DATA,FRA
srvctl add instance -d india -i bhavin1 -n dr-node1
srvctl add instance -d india -i bhavin2 -n dr-node2
srvctl start database -d india
srvctl modify database -d india -s mount
If the standby database should not start in open mode, then it can be changed by below command. The valid options are open (default), mount and nomount.
srvctl modify database -d india -s mount
Verify the configuration of standby database india.
srvctl config database -d india
Start the Active Dataguard:
In Active Dataguard, the MRP can be running while the Physical Standby database is opened in READ ONLY mode. So, start the MRP after the database is opened in read only mode to activate the Active Dataguard.
srvctl start database –d india –o open
alter database recover managed standby database disconnect from session;
Create the Standby Redo Logs (SRLs) on Standby:
DUPLICATE DATABASE command has replicated the same no. of Online Redo Logs and Standby Redologs from primary database to the Standby database. So, they were not needed to create here.
DUPLICATE DATABASE command has replicated the same no. of Online Redo Logs and Standby Redologs from primary database to the Standby database. So, they were not needed to create here.
Change the Protection Mode:
New Protection Mode: Maximum Availability.
On Primary:
alter system set LOG_ARCHIVE_DEST_2='SERVICE=INDIA SYNC NOAFFIRM VALID_FOR=(ONLINE_LOGFILES,PRIMARY_ROLE) DB_UNIQUE_NAME=INDIA' scope=both sid='*';
alter database set standby database to maximize availability;
On Standby:
alter system set LOG_ARCHIVE_DEST_2='SERVICE=USA SYNC NOAFFIRM VALID_FOR=(ONLINE_LOGFILES,PRIMARY_ROLE) DB_UNIQUE_NAME=USA' scope=both sid='*';
alter database set standby database to maximize availability;
Final Configuration Files:
Here is the final look of parameter file, tnsnames.ora and listener.ora files at this stage of successful configuration of 3-node RAC primary to 2-node RAC Physical DataGuard.
· Stop the MRP
· Modify the Listener.ora files
· Modify the init Parameters
· Create Configuration
· Enable Configuration
· Verify the Configuration
Stop the MRP on standby database:
alter database recover managed standby database cancel;
Modify the listener.ora files:
Update the listener.ora on all the nodes in Dataguard configuration to register a service with the local listener for each instance for the proper functioning of DGMGRL. Add the below lines to the listener.ora file for each of the specified instances.
Primary Node1
SID_LIST_BHAVIN_LISTENER=(SID_LIST=(SID_DESC=(SID_NAME=bhavin1)(GLOBAL_DBNAME=usa_DGMGRL.hingu.net)(ORACLE_HOME=/u01/app/oracle/db11201)))
Primary Node2
SID_LIST_BHAVIN_LISTENER=(SID_LIST=(SID_DESC=(SID_NAME=bhavin2)(GLOBAL_DBNAME=usa_DGMGRL.hingu.net)(ORACLE_HOME=/u01/app/oracle/db11201)))
Primary Node3
SID_LIST_BHAVIN_LISTENER=(SID_LIST=(SID_DESC=(SID_NAME=bhavin3)(GLOBAL_DBNAME=usa_DGMGRL.hingu.net)(ORACLE_HOME=/u01/app/oracle/db11201)))
Standby Node1
SID_LIST_BHAVIN_LISTENER=(SID_LIST=(SID_DESC=(SID_NAME=bhavin1)(GLOBAL_DBNAME=india_DGMGRL.hingu.net)(ORACLE_HOME=/u01/app/oracle/db11201)))
Standby Node2
SID_LIST_BHAVIN_LISTENER=(SID_LIST=(SID_DESC=(SID_NAME=bhavin2)(GLOBAL_DBNAME=india_DGMGRL.hingu.net)(ORACLE_HOME=/u01/app/oracle/db11201)))
After updating these listener.ora files, restart listeners on each of these nodes.
Modify the init parameters:
Modify these below DataGuard Broker related parameters on both the sides.
Standby:
mkdir +fra/india/DATAGUARDCONFIG
mkdir +data/india/DATAGUARDCONFIG
ALTER SYSTEM SET DG_BROKER_CONFIG_FILE1='+fra/india/DATAGUARDCONFIG/dgb_config02.ora' SCOPE=BOTH sid='*';
ALTER SYSTEM SET DG_BROKER_CONFIG_FILE2='+data/india/DATAGUARDCONFIG/dgb_config01.ora' SCOPE=BOTH sid='*';
alter system set dg_broker_start=true scope=both sid='*';
primary:
mkdir +fra/usa/DATAGUARDCONFIG
mkdir +data/usa/DATAGUARDCONFIG
ALTER SYSTEM SET DG_BROKER_CONFIG_FILE1='+fra/usa/DATAGUARDCONFIG/dgb_config02.ora' SCOPE=BOTH sid='*';
ALTER SYSTEM SET DG_BROKER_CONFIG_FILE2='+data/usa/DATAGUARDCONFIG/dgb_config01.ora' SCOPE=BOTH sid='*';
alter system set dg_broker_start=true scope=both sid='*';
Create Configuration:
Connect to the DGMGRL and run the below statements to create and enable the DataGuard configuration. Verify that the DG Broker is configured correctly and it has all the databases and instances registered as expected.
CREATE CONFIGURATION 'DG_Config' AS PRIMARY DATABASE IS 'usa' CONNECT IDENTIFIER IS 'usa';
ADD DATABASE 'india' AS CONNECT IDENTIFIER IS india;
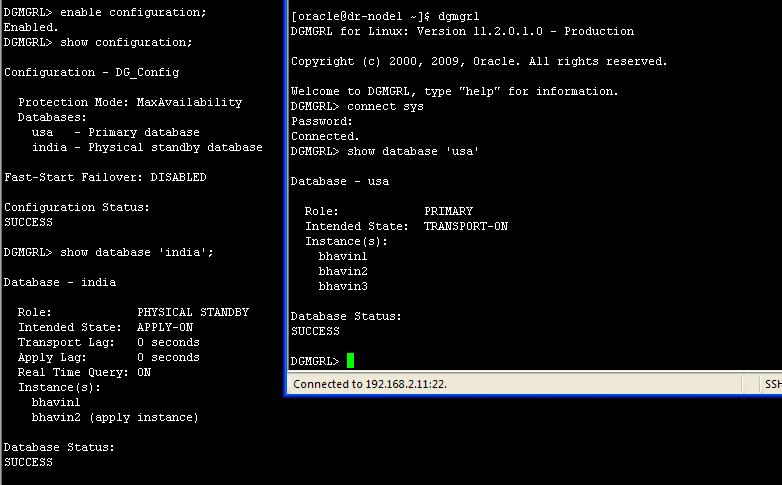
Enable Configuration:
enable configuration;
Verify Configuration:
show configuration;
show database verbose india;
show database verbose usa
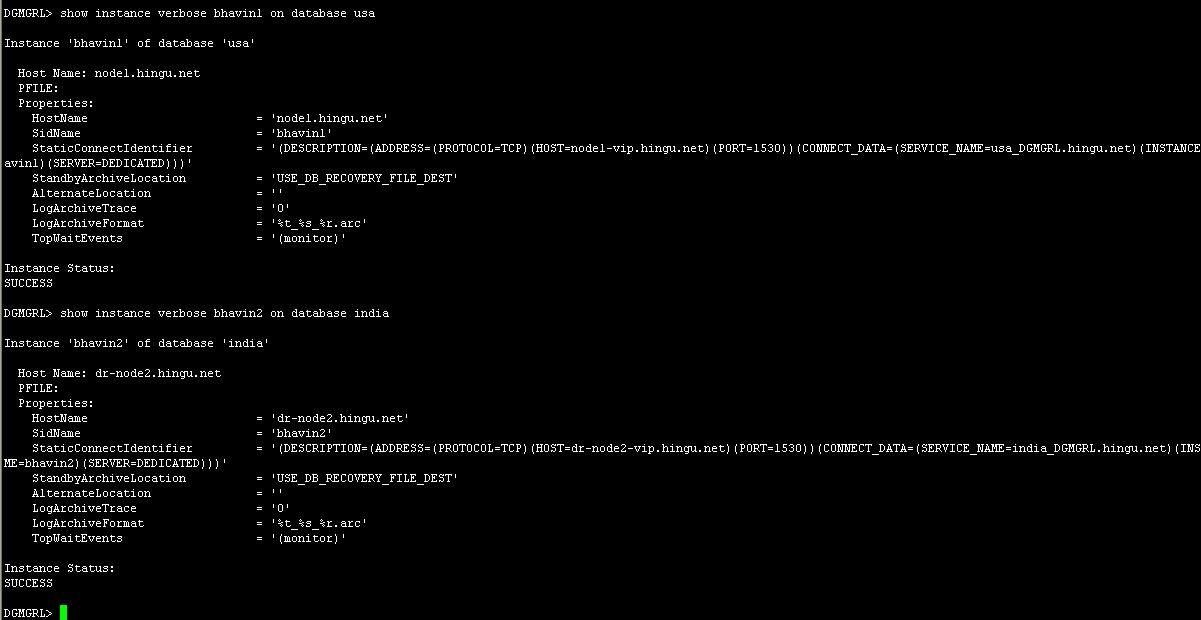
show instance verbose bhavin1 on database usa
show instance verbose bhavin2 on database usa
show instance verbose bhavin3 on database usa
show instance verbose bhavin1 on database india
show instance verbose bhavin2 on database india
I received the below error while performing either switchover or failover operation using DataGuard Broker. This is due to the Oracle bug (9645789) occurring when DG Broker trying to stop any custom services in the database. The workaround is to remove all the custom services using srvctl command and add them back in the OCR at the end of the role transition operation.
DGMGRL> switchover to india
Performing switchover NOW, please wait...
Error: ORA-16535: Oracle Restart or Oracle Clusterware prevented completion of broker operation
Failed.
Unable to switchover, primary database is still "usa"
srvctl stop service –d usa –s oltp
srvctl remove service –d usa –s oltp
show parameter service_names (SQLPLUS)
Switchover:
· Shutdown all the instance on Primary but one.
· Shutdown all the instance on Standby but one.
· Connect to dgmgrl on primary.
· Execute “switchover to india” on dgmgrl.
After the successful Switchover operation , start the remaining instances on both the databases. Modify the database configuration in OCR with their appropriate role and start option. Add any custom services to the new Primary (india) database that were removed earlier.
srvctl modify database – d usa –r physical_standby –s mount
srvctl modify database –d india –r primary –s open
srvctl add service -d india -s oltp -r bhavin1,bhavin2 -r primary -e session -m basic -B SHORT (on the new Primary cluster)
srvctl add service -d usa -s oltp -r bhavin1,bhavin2,bhavin3 -r physical_standby -e session -m basic -B SHORT (on the new standby cluster)
For the Failover, use DGMGRL command “failover to usa”
Comments
Post a Comment
Oracle DBA Information