Oracle 11g Release 2 – Single Client Access Name (SCAN)
Introduction
Single Client Access Name (SCAN) concept was first introduced in Oracle 11g Release 2 is a feature used in Oracle Real Application Cluster environments that provides a single connection name for clients. By using SCAN you don’t need to keep all cluster node entries in client’s tnsnames.ora file. Instead you use single SCAN address or hostname to access any Oracle Database running in a cluster by making it more dynamic. In other words, SCAN is an alias for databases in the cluster. The main purpose is that the client’s connect information does not needs to be changed if you add to or remove nodes from cluster. New terms such as SCAN Name, SCAN VIP, SCAN Listener, Node VIP comes with this feature and sometimes makes it complicated for new DBA’s.
Note: You can read this post in more conventional format from here
Basically SCAN Listeners are introduced to create another connection handler on top of existing Node Listeners to overcome the failover and load balancing issues till Oracle 11g Release 1 architecture for Real Application Cluster environments. Till 11gR2 Node Listeners were defined on VIPs to facilitate NACK (Negative Acknowledgement) to resolve the issue of TCP timeouts.
Having a single name to access the cluster to connect to a database in this cluster allows clients to use EZConnect and the simple JDBC thin URL to access any database running in the cluster, independently of the number of databases or servers running in the cluster and regardless on which server(s) in the cluster the requested database is actually active.
EZconnet sqlplus system/manager@sales1-scan:1521/oltp
JDBC connect jdbc:oracle:thin:@sales1-scan:1521/oltpExample 1: Sample EZConnect and Thin JDBC Connect Strings
Why it is very good feature?
In previous Oracle RAC releases you will need to setup the tnsnames.ora in such a way so that it know all the Node VIP (Virtual IP) address in it so client can connect to Oracle Real Application Clusters Database which are listening on VIP address.
For example:
For example:
racdb10g =
  (DESCRIPTION=
    (LOAD_BALANCE=ON)
    (FAILOVER=ON)
    (ADDRESS=(PROTOCOL=TCP)(HOST=node1)(PORT=1521))
    (ADDRESS=(PROTOCOL=TCP)(HOST=node2)(PORT=1521))
    (CONNECT_DATA=
      (SERVICE_NAME=racdb10g)
      (FAILOVER_MODE=
        (TYPE=SELECT)
        (METHOD=BASIC)
        (RETRIES=10)
        (DELAY=15)
      )
    )
  )
Example 2: Oracle 10g client’s tnsnames.ora file for RAC Database
So if you add a node to existing cluster or remote a node from the existing cluster you will need to modify the tnsnames.ora file on all the client. This can be painful if you have 999 client computers using the RAC architecture, so Oracle has come up with SCAN which solves this problem.
With SCAN – Your entire cluster will be identified with single common clustered name which you need to use while connecting to cluster so it does not matter whether you add a node or remove a node from cluster. You do not need to modify client’s tnsnames.ora
For example:
For example:
racdb11gR2 =
  (DESCRIPTION=
    (LOAD_BALANCE=ON)
    (FAILOVER=ON)
    (ADDRESS=(PROTOCOL=TCP)(HOST=cluster-scan)(PORT=1521))
    (CONNECT_DATA=
      (SERVICE_NAME=racdb11g2)
      (FAILOVER_MODE=
        (TYPE=SELECT)
        (METHOD=BASIC)
        (RETRIES=10)
        (DELAY=15)
      )
    )
  )
Example 3: Oracle 11g Release 2 client’s tnsnames.ora file for RAC Database
SCAN also provides the connect time load balancing so it forwards the request to least loaded node in the cluster which completely transparent to client. Understanding above listed SCAN related components individually and use of each is an important for Database Administrators. Otherwise you can’t relate them together and understand SCAN Concept in complete.
SCAN Name
A unique hostname within an entire organization network which by default can resolve three IP addresses by default configuration. At least one IP address is required for Oracle 11g Release 2 Real Application Cluster installation. This name is used in the client’s tnsnames.ora file. All database connections are made through this name. You can use below commands to get SCAN Name details.
[oracle@rac1 grid]$ srvctl config scan
SCAN name: cluster-scan, Network: 1/192.168.11.0/255.255.255.0/eth0
SCAN VIP name: scan1, IP: /cluster-scan/192.168.11.200
SCAN VIP name: scan2, IP: /cluster-scan/192.168.11.201
SCAN VIP name: scan3, IP: /cluster-scan/192.168.11.202
Example 4: Getting SCAN configuration details
SCAN VIP
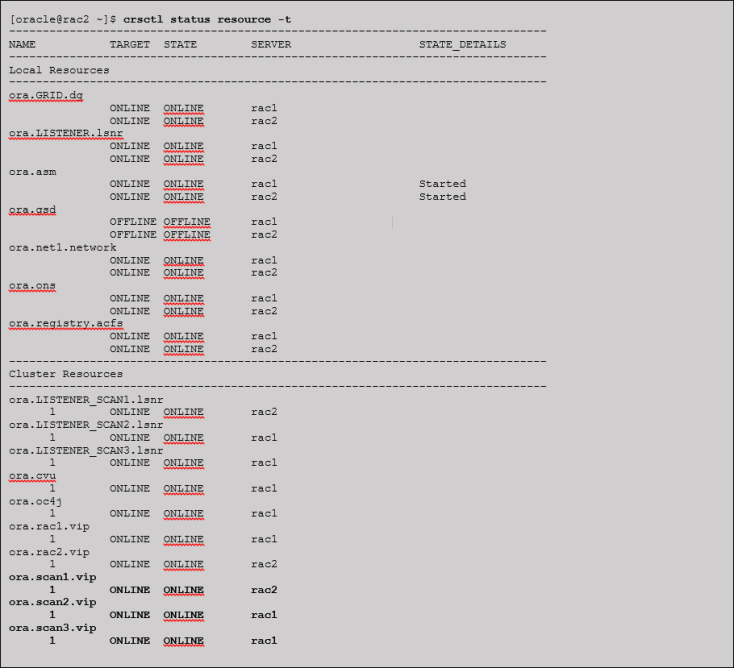
SCAN Name resolves to one or more than one IP addresses. These IP addresses are called as SCAN VIP or SCAN IP. Each SCAN VIP has a corresponding SCAN Listener generated for it. If there is one SCAN IP then one SCAN Listener will be generated, if there are three SCAN IP’s three SCAN Listeners will be generated. These SCAN Listeners run on any of three nodes on the Real Application Cluster environment or it could be two SCAN Listener on one node and one in another node if there are three SCAN Listener and only two nodes in the Cluster. SCAN VIP is one of the resources which you can find in the output of “crsctl status resource -t” command. Number of SCAN VIP’s you notice will be the same as the number of SCAN Listeners in the setup. SCAN VIP’s are physical IP addresses that you allocate to SCAN Listeners. In the below example 192.168.11.200, 192.168.11.201, 192.168.11.202 are SCAN VIP’s. If you identify that SCAN VIP’s are online in the output of “crsctl status resource -t” command then IP addresses are online on the physical network ports. Only when SCAN VIP’s are online we can start the SCAN Listeners.
SCAN VIP and SCAN Listener works as a pair when SCAN VIP fails over to other node, the corresponding SCAN Listener will also be failed over to the same node. Whenever SCAN VIP fails over happens, it will always select a node with least running SCAN VIP. For example if SCAN VIP runs on node1, node2 and node3 of a 4 – node cluster, then if node3 goes down, the SCAN VIP and corresponding SCAN Listener will be failed over to node4 as the other two nodes already have one SCAN VIP running on each node. Database Administrator can use below command to find SCAN Listener running on a node and SCAN VIP corresponding to it.
[oracle@rac1 grid]$ ps -ef | grep lsnr | grep -v grep
oracle   22117     1  0 09:32 ?        00:00:00 /u01/app/11.2.0/grid/bin/tnslsnr LISTENER_SCAN2 -inherit
oracle   22132     1  0 09:32 ?        00:00:00 /u01/app/11.2.0/grid/bin/tnslsnr LISTENER_SCAN3 -inherit
oracle   24136     1  0 09:54 ?        00:00:00 /u01/app/11.2.0/grid/bin/tnslsnr LISTENER –inherit
Example 6: Getting List of SCAN Listeners running on a node.
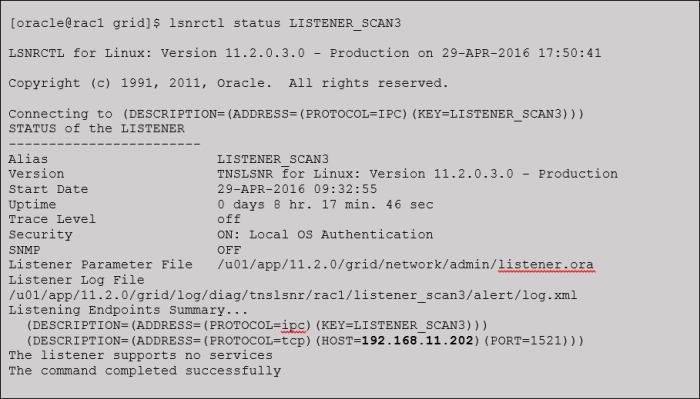
From the above grep command DBA can see, this node has two SCAN Listener running at this moment. SCAN Listener having name LISTENER_SCAN3 is running on SCAN VIP 192.168.11.202 as shown in HOST parameter of lsnrctl status output.
SCAN Listener
As explained above, each SCAN VIP has SCAN Listener associated with each other and both works as a pair. One SCAN Listener is created corresponding to one SCAN VIP. SCAN Listener used to run on database nodes. To get the list of all SCAN Listeners and corresponding nodes on which they are running use following command:
[oracle@rac1 grid]$ srvctl status scan_listener
SCAN Listener LISTENER_SCAN1 is enabled
SCAN listener LISTENER_SCAN1 is running on node rac2
SCAN Listener LISTENER_SCAN2 is enabled
SCAN listener LISTENER_SCAN2 is running on node rac1
SCAN Listener LISTENER_SCAN3 is enabled
SCAN listener LISTENER_SCAN3 is running on node rac1
Example 8: Getting SCAN Listeners node information
In this example, there is a two node RAC having three SCAN Listeners, rac2 node has LISTENER_SCAN1 running while rac1 node has LISTENER_SCAN2 and ISTENER_SCAN3 running on it.
SCAN Listener is the oracle component which starts running a service on the port (by default its 1521) using the SCAN VIP (IP address). So SCAN Listener doesn’t start if SCAN VIP is not online. This is the major difference between a SCAN Listener and SCAN VIP. The number of SCAN Listeners you notice in the output will be the same as number of SCAN VIP’s ONLINE. Name that is given to SCAN Listener is referred as SCAN Name and it is registered in DNS server. So in short, always SCAN Listener and SCAN VIP are related to each other.
Node VIP
Each Database node in Real Application Clusters environment has one Node IP and one Node VIP address. The main difference between these two is Node VIP can move to any other node in case if current node is down but Node IP can’t do that. Whenever a new connection request is made the SCAN Listener listening on a SCAN IP address and the SCAN port is contracted on a client’s behalf. Because all services on the cluster are registered with the SCAN Listener, the SCAN Listener replies with the address of the Local Listener as Node VIP address on the least-loaded node (Each SCAN Listener keeps updated cluster load statistics) and connection is routed to that node. Local Listener on the Database Server is registered with Node VIP and Node IP address.
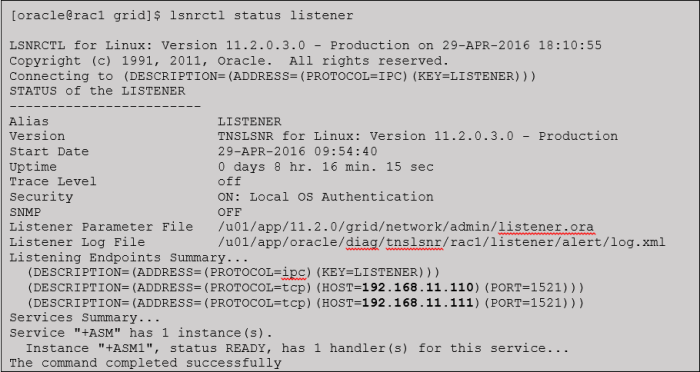
Here we can see that Local Listener is registered with two IP addresses192.168.11.110 is Node IP address and 192.168.11.111 is Node VIP address. Node VIP is the IP address which has capability of relocating to Local Listener of other node when the current node goes down. Drawback of using only node VIP is TNS entry of application server should have all node VIP addresses updated. You can identify that, the IP address assigned to node VIP will be a part of Local Listener. If you run “lsnrctl status” on every node then you will find that local listener has two IP addresses – 1. node IP and 2. node VIP.
Local Listener
This is a database parameter which is used to provide detail of Local Listener running on database node itself. In Real Application Clusters environment this has Node VIP address as value.
SQL> show parameter local
NAME                                 TYPE        VALUE
------------------------------------ ----------- ------------------------------
local_listener                       string      (DESCRIPTION=(ADDRESS_LIST=(AD
                                                 DRESS=(PROTOCOL=TCP)(HOST=192.
                                                 168.11.121)(PORT=1521))))
Example 10: Getting local_listener parameter value
When a new connection request is made to SCAN Listener, this address is returned to the SCAN Listener and then connection is made to database Local Listener. The difference between SCAN Listener and Local Listener is SCAN listener runs on corresponding to SCAN VIP’s while Local Listener runs with Node VIP or Node IP address. SCAN Listener can move to another database node in case of node failure but Local Listener doesn’t have this kind of behavior.
Remote Listener
In a Real Application Cluster environment each database have this parameter set to SCAN Name of the cluster environment. SCAN Name in turn has one or more IP address further called SCAN VIP and each SCAN VIP has SCAN Listener running on it, so finally each database instance register itself with all SCAN Listeners running across the Clusterware.
SQL> show parameter remote_listener
NAME                                 TYPE        VALUE
------------------------------------ ----------- ------------------------------
remote_listener                      string      cluster-scan:1521
Example 11: Getting remote_listener parameter value
The purpose of remote_listener parameter is to register each database instance with all SCAN Listeners in RAC. This provide information on what services are being provided by the instance, the current load, and a recommendation on how many incoming connections should be directed to the instance.
Network Requirements for Using SCAN
The default SCAN configuration is defined during the installation of Oracle Grid Infrastructure that is distributed with Oracle Database 11g Release 2 or higher. Oracle Grid Infrastructure is a single Oracle Home that contains Oracle Clusterware and Oracle Automatic Storage Management. You must install Oracle Grid Infrastructure first in order to use Oracle RAC 11g Release 2 or higher. During the interview phase of the Oracle Grid Infrastructure installation, you will be prompted to provide a SCAN name. There are 2 options for defining the SCAN:
- Define a SCAN using the corporate DNS (Domain Name Service)
- Define a SCAN using the Oracle GNS (Grid Naming Service)
Why SCAN needs DNS?
You must have DNS server setup if you want to use SCAN. The reason is, if you use /etc/hosts file for the SCAN than all the requests for the SCAN will be forwarded to first SCAN node specified in /etc/hosts because /etc/hosts file does not have capability of round robin name resolution but if you use the DNS server than SCAN can take the advantage of DNS’s round robin name resolution feature.
Defining a SCAN using DNS
If you choose first option, you must ask your network administrator to create at least one single name that resolves to three IP addresses using a round-robin algorithm. Three IP addresses are recommended considering load balancing and high availability requirements regardless of the number of servers in the cluster. The IP addresses must be on the same subnet as your default public network in the cluster. The name must be 15 characters or less in length, not including the domain, and it must be resolvable without the domain suffix (for example: “sales1-scan’ must be resolvable as opposed to “cluster-scan.example.com”). The IPs must not be assigned to a network interface, since Oracle Clusterware will take care of it.
[oracle@rac1 grid]$ nslookup cluster-scan
Server:         192.168.11.100
Address:        192.168.11.100#53
Name:   cluster-scan.oracle.com
Address: 192.168.11.200
Name:   cluster-scan.oracle.com
Address: 192.168.11.201
Name:   cluster-scan.oracle.com
Address: 192.168.11.202
Example 12: Sample DNS entry for SCAN
You can check the SCAN configuration in DNS using “nslookup”. If your DNS is set up to provide round-robin access to the IPs resolved by the SCAN entry, then run the “nslookup” command at least twice to see the round-robin algorithm work. The result should be that each time, the “nslookup” would return a set of three IPs in a different order.
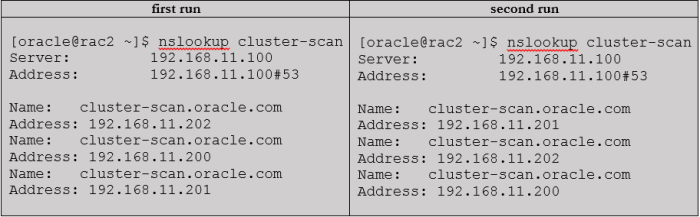
Note: If your DNS server does not return a set of three IPs as shown in figure 3 or does not round-robin, ask your network administrator to enable such a setup. Round-robin on DNS level allows for a connection request load balancing across SCAN Listeners floating in the cluster. It is not required for SCAN to function as a whole and the absence of such a setup will not prevent the failover of a connection request to another SCAN Listener, in case the first SCAN Listener in the list is down. The Oracle Client typically handles failover of connections requests across SCAN Listeners in the cluster. Oracle Clients of version Oracle Database 11g Release 2 or higher will not require any special configuration to provide this type of failover. Older clients require considering additional configuration1. It is therefore recommended that the minimum version of the client used to connect to a database using SCAN is of version Oracle Database 11g Release 2 or higher. Using client-side DNS caching may generate a false impression that DNS round-robin is not occurring from the DNS server. (DNS not return a set of three IPs as shown in figure 13). Client-side DNS caches are typically used to minimize DNS requests to an external DNS server as well as to minimize DNS resolution time. This is a simple recursive DNS server with local items. If the client-side DNS cannot be set up to provide round-robin locally or cannot be disabled, Oracle Clients using a JDBC:thin connect will typically attempt a connection to the SCAN-IP and SCAN Listener which is returned first in the list. This basically disables the connection request load balancing across SCAN Listeners in the cluster from those clients, but does not affect SCAN functionality as a whole. Oracle Call Interface (OCI) based database access drivers will apply an internal round-robin algorithm and do not need to be considered in this case.
2. Define a SCAN using the Oracle GNS
If you choose second option, you only need to enter the SCAN Name during the interview. At some stage in the cluster configuration, three IP addresses will be acquired from either a DHCP service or using “Stateless Address AutoConfiguration” (SLAAC) when using IPv6 based IP addresses with Oracle RAC 12c (using GNS, however, assumes that you use some form of dynamic IP assignment on your public network) to create the SCAN. SCAN Name resolution will then be provided by the GNS.
Workaround if No DNS Server is Available at Installation Time
Oracle Universal Installer (OUI) enforces providing a default SCAN resolution during the Oracle Grid Infrastructure installation, since the SCAN concept is an essential part during the creation of Oracle RAC 11g Release 2 or higher databases in the cluster. All Oracle Database 11g Release 2 or higher tools used to create a database (e.g. the Database Configuration Assistant (DBCA), or the Network Configuration Assistant (NetCA)) would assume its presence. Hence, OUI will not let you continue with the installation until you have provided a suitable SCAN resolution. However, in order to overcome the installation requirement without setting up a DNS-based SCAN resolution, you can use a hosts-file based workaround. In this case, you would use a typical hosts-file entry to resolve the SCAN to one IP address only. It is not possible to simulate the round-robin resolution that the DNS server does using a local host file. The host file look-up the OS performs will only return the first IP address that matches the name. Neither will you be able to do so in one entry (one line in the hosts-file). Thus, you will create only one SCAN for the cluster. (Note that you will have to change the hosts-file on all nodes in the cluster for this purpose.) This workaround might also be used when performing an upgrade from former (pre-Oracle Database 11g Release 2 or higher) releases. However, it is strongly recommended to enable the SCAN configuration as described under “Option 1” or “Option 2” in this paper shortly after the upgrade or the initial installation. In order to make the cluster aware of the modified SCAN configuration, delete the entry in the hosts-file and then issue: “srvctl modify scan -n
.[root@rac1 grid]$ srvctl modify scan -n scan
SCAN Configuration with Oracle Grid Infrastructure 11g Release 2
During cluster configuration, several resources are created in the cluster for SCAN. For each of the 3 IP addresses that the SCAN resolves to, a SCAN VIP resource is created and a SCAN Listener is created. The SCAN Listener is dependent on the SCAN VIP and the 3 SCAN VIPs (along with their associated listeners) will be dispersed across the cluster. This means, each pair of resources (SCAN VIP and SCAN Listener) will be started on a different server in the cluster, assuming the cluster consists of three or more nodes. In case, a 2-node-cluster is used (for which 3 IPs are still recommended for simplification reasons), one server in the cluster will host two sets of SCAN resources under normal operations. If the node on which a SCAN VIP is running fails, the SCAN VIP and its associated listener will fail over to another node in the cluster. If by means of such a failure the number of available servers in the cluster becomes less than three, one server would again host two sets of SCAN resources. If a node becomes available in the cluster again, the formerly mentioned dispersion will take effect and relocate one set accordingly.
[oracle@rac1 grid]$ srvctl config scan_listener
SCAN Listener LISTENER_SCAN1 exists. Port: TCP:1521
SCAN Listener LISTENER_SCAN2 exists. Port: TCP:1521
SCAN Listener LISTENER_SCAN3 exists. Port: TCP:1521
[oracle@rac1 grid]$ srvctl config scan
SCAN name: scan, Network: 1/192.168.11.0/255.255.255.0/eth0
SCAN VIP name: scan1, IP: /scan/192.168.11.215
SCAN VIP name: scan2, IP: /scan/192.168.11.205
SCAN VIP name: scan3, IP: /scan/192.168.11.210

Example 15: SCAN configuration in Oracle Grid İnfrastructure Release 2
Oracle Database Configuration Using SCAN
Ever since Oracle Database 11g Release 2, SCAN is an essential part of the Oracle RAC database configuration and therefore the REMOTE_LISTENER parameter is set to the SCAN per default, assuming that the database is created using standard Oracle tools (e.g. the formerly mentioned DBCA). This allows the instances to register with the SCAN Listeners as remote listeners to provide information on what services are being provided by the instance, the current load and a recommendation on how many incoming connections should be directed to the instance. In this context, the LOCAL_LISTENER parameter must be considered. The LOCAL_LISTENER parameter should be set to the node-VIP. If you need fully qualified domain names, ensure that LOCAL_LISTENER is set to the fully qualified domain name (e.g. node-VIP.example.com). By default, a node listener is created on each node in the cluster during cluster configuration. If you want to use multiple subnets with your cluster, additional node-VIPs should be configured after the initial installation as discussed in section “Enabling Multiple-Subnet Support for SCAN” of this paper. Starting with Oracle Grid Infrastructure 11g Release 2 the node listener run out of the Oracle Grid Infrastructure home and listens on the node-VIP using the specified port (default port is 1521). Unlike in former database versions, it is not recommended to set your REMOTE_LISTENER parameter to a server side TNSNAMES alias that resolves the host to the SCAN (HOST=cluster-scan) in the address list entry, but use the simplified “SCAN:port” syntax as shown in Example 10.
 NAME                TYPE    VALUE
 ------------------- ------- -----------------------------------------
 local_listener      string  (DESCRIPTION=(ADDRESS_LIST=(AD
                             DRESS=(PROTOCOL=TCP)(HOST=133.
                             22.67.111)(PORT=1521))))
 remote_listener     string   sales1-scan.example.com:1521
Example 16: LOCAL and REMOTE_LISTENER default configuration
Note: if you use the easy connect naming method, you may need to modify your SQLNET.ORA to ensure that EZCONNECT is in the list when specifying the order of the naming methods used for the client name resolution lookups:
(NAMES.DIRECTORY_PATH=(tnsnames, ldap, ezconnect))
What happens behind the scene?
When client wants a connection database unlike the previous releases the client will use SCAN as specified in tnsnames.ora. The DNS server will return three IP addresses for the SCAN and the client will try to connect to each IP address given by DNS server until the connection is not made. So with Oracle Database 11g Release 2 the Client will initiate the connection to SCAN listener which will forward the connection request to least loaded the node within the cluster.
This is a complicated process but each and every part has it’s own role to play which make it complete. Below described step by step Database Connection Process in Oracle 11g Release 2 RAC Environment.
This is a complicated process but each and every part has it’s own role to play which make it complete. Below described step by step Database Connection Process in Oracle 11g Release 2 RAC Environment.
- SCAN Name is used in tnsname.ora file of client machine, So for new connection DNS server return to one of the IP address of SCAN Name to client machine called SCAN VIP.
- SCAN VIP must be using by a Database Node and a SCAN Listener should be running on this SCAN VIP on that node.
- SCAN Listener has all database instances registered with it, it check internally about load and availability and return Node VIP address to connect for.
- Each Node VIP has a Local Listener running on database node for it and has a Node IP as well. This returns listener detail and database connection is made with the Local database listener.
Step by step Database Connection Process in Oracle 11g R2 RAC environment
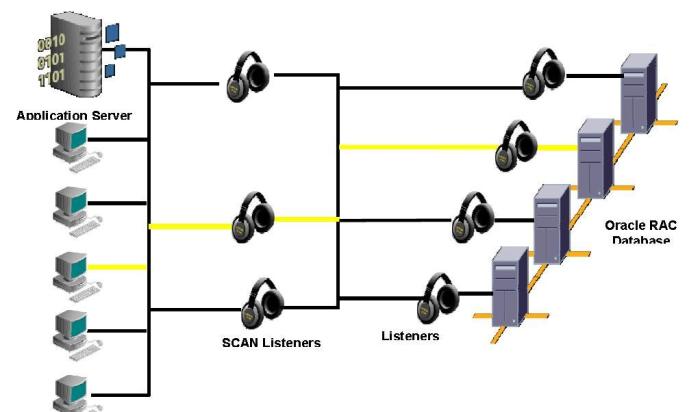
Let us now understand the detailed architecture of SCAN with the help of below image that serves the user requests from application server.

Assumptions:
- 4 Node RAC setup
- 3 SCAN Listeners on SCAN VIPs (192.168.122.5, 192.168.122.6, 192.168.122.7)
- DNS server in use
- TNS of application uses SCAN_LISTENER as hostname
- Database is new and no connections
Explanation for each stage numbered in the image:
- 0 sec: User 1 when tries to establish a session on database with connection request C1, it hits DNS server first.
- DNS server will then resolve the name “SCAN_LISTENER” to the first IP 192.168.122.5
- C1 request reaches the first scan listener SCAN1 mostly the default name will be “LISTENER_SCAN1” which is running on 192.168.122.5 SCAN VIP.
- SCAN1 using details from LBA (Load Balancing Advisor), identifies the load on each node in the setup and routes the request C1 to node which has least load.
- In this case it happened to be NODE 2 with least load or no load and the C1 request is addressed by local listener on this node which helps C1 to establish a session on instance on NODE 2.
- 5th sec: User 2 when tries to establish a session on database with connection request C2, it hits DNS serer first.
- DNS server will now use Round-Robin algorithm and resolves the name “SCAN_LISTENER” to second IP 192.168.122.6
- C2 request reaches the second scan listener SCAN2 mostly the default name will be “LISTENER_SCAN2” which is running on 192.168.122.6 SCAN VIP.
- SCAN2 using details from LBA (Load Balancing Advisor), identifies the load on each node in the setup and routes the request C2 to node which has least load.
- In this case it happened to be NODE 1 with least load or no load and the C2 request is addressed by local listener on this node which helps C2 to establish a session on instance on NODE 1.
Client Load Balancing using SCAN
For clients connecting using Oracle SQL*Net 11g Release 2, three IP addresses will be received by the client by resolving the SCAN name through DNS as discussed. The client will then go through the list it receives from the DNS and try connecting through one of the IPs received. If the client receives an error, it will try the other addresses before returning an error to the user or application. This is similar to how client connection failover works in previous releases when an address list is provided in the client connection string. When a SCAN Listener receives a connection request, the SCAN Listener will check for the least loaded instance providing the requested service. It will then re-direct the connection request to the local listener on the node where the least loaded instance is running. Subsequently, the client will be given the address of the Local Listener. The Local Listener will finally create the connection to the database instance.
As We know when a client request goes directly to a local listener running on a node server side load balancing also takes place and client request is forwarded to the least loaded instance .Then why do we need a SCAN Listener ?
First let’s see how server side load balancing implemented even when the request goes to Local Listener running on the node.
If I have a 3 node setup and the request goes to Local Listener of Node1 and Node1 is already overloaded, its Listener will forward this request to any of the remaining nodes only if it knows about their workload information. It will get this information only if REMOTE_LISTENER parameter on Node1’s instance is set to listeners of the other two nodes. Similarly, REMOTE_LISTENER parameter of other instances should be set to the listeners running on all the nodes except themselves. It means that we have different values of the parameter REMOTE_LISTENER on different instances. Additionally, if a node is added to the cluster, we need to modify the parameter on all the instances.
Now consider the case when we have SCAN listener running and all the local listeners are registered with it. The parameter REMOTE_LISTENER of all the instances is set to SCAN listener. The request comes to the SCAN listener which gets load info of all the nodes from their respective local listeners and forwards the request to the least loaded node. Moreover, when a node is added, its local listener gets automatically registered with SCAN listener and we need not modify the parameter REMOTE_LISTENER. Hence SCAN listener simplifies the management considerably.
Pre Oracle Database 11g Release 2 environments, clients may take up to 2 minutes to decide (on TCP level) a node is own. This is purely because of the TCP Timeouts, which can differ from platform to platform. These 2 minutes are unacceptable, and it was a good thing of Oracle to understand and address this issue. Oracle designed a virtual IP address to be assigned to the public interface. Under normal circumstances, the VIP will be located to its designated NIC, and the listener will be bound to this VIP. Whenever there is a need to failover the VIP to another node in the cluster, when clients want to connect to this VIP (due to TNS alias addresses pointing to this VIP), the VIP will immediately respond (because it has failed over and the TCP stack is running against it), and the client is able to get negative acknowledgement (NACK) confirming that no Listener is active at its designated port. Within few seconds the client will know and fail over to the alternative address in its TNS alias. This makes failover a lot faster.
Modifying SCAN Configuration in Oracle 11g Release 2 RAC
Adding new SCAN Listener to Cluster
In below post we will explore little more about SCAN listeners. The common question comes in mind like: How many SCAN Listeners could be configured in a multi-node RAC environment? How many SCAN Listeners would actually be required and how many would be enough?
Let’s find out the answers for these common queries.
In practice any complex environment designed with multi-tier architecture involving connection handling via connection pool mechanism. It reduces connectivity time for application or web based end users. Normally 3 SCANs are capable enough to handle hundreds of new connections in a span of few seconds. Still if you feel that default 3 SCAN Listeners are not enough for your environment then you have an option to add few more SCAN Listeners. GNS based dynamic IP scheme still has no way to change number of SCAN Listeners in your environment. In this post we will elaborate the process of adding one extra SCAN Listeners in our DNS based static IP configuration.
It could be done in following simple steps without affecting the availability of the cluster:
- Add additional unused IP from same subnet into DNS configuration for scan-name pair
- Restart Domain Named Service (DNS)
- Update SCAN from cluster
- Update SCAN Listener from cluster
- Verify the changed configuration
- Start newly added SCAN
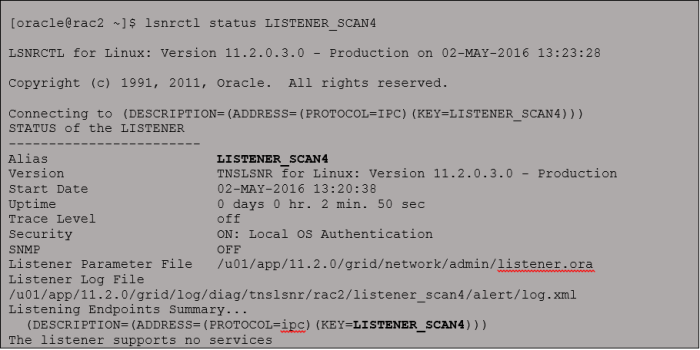
- Verify service registration on newly added LISTENER_SCAN4 SCAN Listener
Currently SCAN Name cluster-scan is resolved into pair of 3 IPs (192.168.11.200/201/202)
[oracle@rac2 ~]$ nslookup cluster-scan
Server:         192.168.11.100
Address:        192.168.11.100#53
Name:   cluster-scan.oracle.com
Address: 192.168.11.201
Name:   cluster-scan.oracle.com
Address: 192.168.11.202
Name:   cluster-scan.oracle.com
Address: 192.168.11.200
We have identified IP 192.168.11.203 from same subnet and added that against SCAN Name “cluster-scan” in DNS server.
[root@ocm named]# grep -i 203 11.168.192.in-addr.arpa
203     IN PTR  cluster-scan.oracle.com.
[root@ocm named]# grep -i 203 localdomain.zone
cluster-scan    IN A 192.168.11.203
[root@ocm named]# grep -i 203 oracle.com.zone
cluster-scan    IN A 192.168.11.203
To reflect the changes we need to do restart of DNS (service named)
[root@ocm named]# service named restart
Stopping named:                             [  OK  ]
Starting named:                             [  OK  ]
Now verify that scan name is getting resolved into 4 IPs:
[oracle@rac2 ~]$ nslookup cluster-scan
Server:         192.168.11.100
Address:        192.168.11.100#53

Name:   cluster-scan.oracle.com
Address: 192.168.11.200

Name:   cluster-scan.oracle.com
Address: 192.168.11.201

Name:   cluster-scan.oracle.com
Address: 192.168.11.202

Name:   cluster-scan.oracle.com
Address: 192.168.11.203
Check the current SCAN configuration to compare the pre-post changes
[oracle@rac2 ~]$ srvctl config scan
SCAN name: cluster-scan, Network: 1/192.168.11.0/255.255.255.0/eth0
SCAN VIP name: scan1, IP: /cluster-scan/192.168.11.200
SCAN VIP name: scan2, IP: /cluster-scan/192.168.11.201
SCAN VIP name: scan3, IP: /cluster-scan/192.168.11.202
Now execute the following command with root privileges
[oracle@rac2 ~]$ sudo srvctl modify scan -n cluster-scan
[sudo] password for oracle:
[oracle@rac2 ~]$
Verify the configuration post change
[oracle@rac2 ~]$ srvctl config scan
SCAN name: cluster-scan, Network: 1/192.168.11.0/255.255.255.0/eth0
SCAN VIP name: scan1, IP: /cluster-scan/192.168.11.201
SCAN VIP name: scan2, IP: /cluster-scan/192.168.11.202
SCAN VIP name: scan3, IP: /cluster-scan/192.168.11.203
SCAN VIP name: scan4, IP: /cluster-scan/192.168.11.200
Check the current SCAN Listener configuration to compare the pre-post changes
[oracle@rac2 ~]$ srvctl config scan_listener
SCAN Listener LISTENER_SCAN1 exists. Port: TCP:1521
SCAN Listener LISTENER_SCAN2 exists. Port: TCP:1521
SCAN Listener LISTENER_SCAN3 exists. Port: TCP:1521
Now update the scan listener configuration by executing “srvctl modify scan_listener -u”
[oracle@rac2 ~]$ srvctl modify scan_listener –u
Verify the scan listener configuration post change
[oracle@rac2 ~]$ srvctl config scan_listener
SCAN Listener LISTENER_SCAN1 exists. Port: TCP:1521
SCAN Listener LISTENER_SCAN2 exists. Port: TCP:1521
SCAN Listener LISTENER_SCAN3 exists. Port: TCP:1521
SCAN Listener LISTENER_SCAN4 exists. Port: TCP:1521
Check the status of scan listener
[oracle@rac2 ~]$ srvctl status scan_listener
SCAN Listener LISTENER_SCAN1 is enabled
SCAN listener LISTENER_SCAN1 is running on node rac2
SCAN Listener LISTENER_SCAN2 is enabled
SCAN listener LISTENER_SCAN2 is running on node rac2
SCAN Listener LISTENER_SCAN3 is enabled
SCAN listener LISTENER_SCAN3 is running on node rac1
SCAN Listener LISTENER_SCAN4 is enabled
SCAN listener LISTENER_SCAN4 is not running
Start the LISTENER_SCAN4
[oracle@rac2 ~]$ srvctl start scan_listener -i 4
Check the status of SCAN Listener again
[oracle@rac2 ~]$ srvctl status scan_listener
SCAN Listener LISTENER_SCAN1 is enabled
SCAN listener LISTENER_SCAN1 is running on node rac2
SCAN Listener LISTENER_SCAN2 is enabled
SCAN listener LISTENER_SCAN2 is running on node rac2
SCAN Listener LISTENER_SCAN3 is enabled
SCAN listener LISTENER_SCAN3 is running on node rac1
SCAN Listener LISTENER_SCAN4 is enabled
SCAN listener LISTENER_SCAN4 is running on node rac2
We can see that LISTENER_SCAN4 successfully created and started on node rac2.
Modify SCAN name or SCAN VIP addresses
The original name was “cluster-scan” and I want to rename it to “racdb-scan”. Also I will change SCAN VIP addresses from 192.168.11.200/201 to 192.168.11.205/210. Configure new name in the DNS and check that it works properly.
[root@dns named]# nslookup racdb-scan
Server:         192.168.11.100
Address:        192.168.11.100#53

Name:   racdb-scan.oracle.com
Address: 192.168.11.205

Name:   racdb-scan.oracle.com
Address: 192.168.11.210
Display the current configuration using the following command:
[oracle@rac2 stage]$ srvctl config scan
SCAN name: cluster-scan, Network: 1/192.168.11.0/255.255.255.0/eth0
SCAN VIP name: scan1, IP: /cluster-scan/192.168.11.201
SCAN VIP name: scan2, IP: /cluster-scan/192.168.11.200
Turn off the SCAN and SCAN listeners using the following commands
[oracle@rac2 stage]$ srvctl stop scan_listener

[oracle@rac2 stage]$ srvctl stop scan
[oracle@rac2 stage]$ srvctl status scan_listener
SCAN Listener LISTENER_SCAN1 is enabled
SCAN listener LISTENER_SCAN1 is not running
SCAN Listener LISTENER_SCAN2 is enabled
SCAN listener LISTENER_SCAN2 is not running

[oracle@rac2 stage]$ srvctl status scan
SCAN VIP scan1 is enabled
SCAN VIP scan1 is not running
SCAN VIP scan2 is enabled
SCAN VIP scan2 is not running
Modify the SCAN name using the following command as the root user.
[oracle@rac2 stage]$ sudo srvctl modify scan -n racdb-scan
[sudo] password for oracle:
For 11.2.0.1 only, if you intend to change SCAN name, due to bug 9603829, execute the following:
[oracle@rac2 stage]$ sudo crsctl modify type ora.scan_vip.type -attr "ATTRIBUTE=SCAN_NAME,DEFAULT_VALUE=racdb-scan"
Once SCAN name is changed, update database parameter remote_listener to the new one.
SQL> alter system set remote_listener="racdb-scan:1521";
System altered.
Turn on the SCAN and SCAN listeners again using the following commands
[oracle@rac2 stage]$ srvctl modify scan_listener -u
[oracle@rac2 stage]$ srvctl start scan_listener
Display the changed configuration.
[oracle@rac2 stage]$ srvctl config scan
SCAN name: racdb-scan, Network: 1/192.168.11.0/255.255.255.0/eth0
SCAN VIP name: scan1, IP: /racdb-scan/192.168.11.210
SCAN VIP name: scan2, IP: /racdb-scan/192.168.11.205
Multiple-Subnet Support and LISTENER_NETWORKS
The Oracle 11g Release 2 documentation for the LISTENER_NETWORKS parameter says: “A network may contain multiple local and remote listeners. By default, all listeners are cross-registered with each other. By specifying a set of listeners in the LISTENER_NETWORKS initialization parameter, you can designate a subset of local listeners with a subset of remote listeners. Listeners specified by the LISTENER_NETWORKS parameter should not be specified by the LOCAL_LISTENER and REMOTE_LISTENER parameters.” When using SCANs on multiple subnets, the LISTENER_NETWORKS parameter must be set for all databases that are meant to be reached via different subnets with Oracle Grid Infrastructure 11g Release 2. With Oracle Grid Infrastructure 12c, the Oracle Database Agent manages the LISTENER_NETWORKS parameter as required by default. For more information on the LISTENER_NETWORKS parameter, see the Oracle documentation.
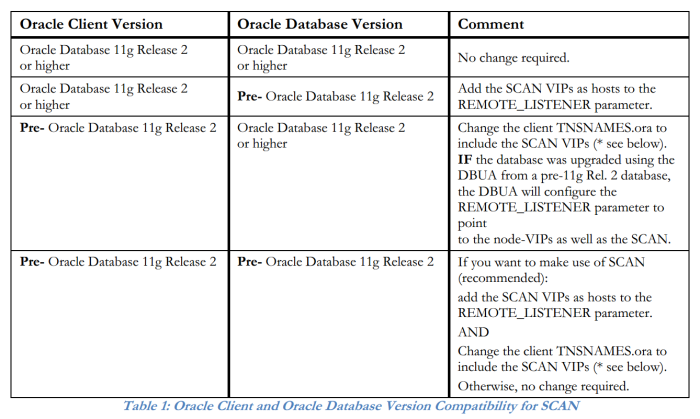
The successful use of SCAN to connect to an Oracle RAC database in the cluster depends on the ability of the client to understand and use the SCAN as well as on the correct configuration of the REMOTE_LISTENER parameter setting in the database as discussed. If the version of the Oracle Client connecting to the database as well as the Oracle Database version used are both Oracle Database 11g Release 2 or higher and the default configuration is used as described in this paper, no changes to the system are typically required.
The same holds true, if the Oracle Client version and the version of the Oracle Database that this client is connecting to are both pre-11g Release 2 version (e.g. Oracle Database 11g Release 1 or Oracle Database 10g Release 2, or older). In this case, the pre-11g Release 2 client would use a TNS connect descriptor that resolves to the node-VIPs of the cluster, while the Oracle pre-11g Release 2 database would still use a REMOTE_LISTENER entry pointing to the node-VIPs.
The same holds true, if the Oracle Client version and the version of the Oracle Database that this client is connecting to are both pre-11g Release 2 version (e.g. Oracle Database 11g Release 1 or Oracle Database 10g Release 2, or older). In this case, the pre-11g Release 2 client would use a TNS connect descriptor that resolves to the node-VIPs of the cluster, while the Oracle pre-11g Release 2 database would still use a REMOTE_LISTENER entry pointing to the node-VIPs.
The disadvantage of this configuration is that SCAN would not be used and hence the clients are still exposed to changes every time the cluster changes in the backend. Similarly, if an Oracle Database 11g Release 2 or higher is used, but the clients remain on a former version. The solution is to change the Oracle client and / or Oracle Database REMOTE_LISTENER settings accordingly. The following cases need to be considered:
Note: If using a pre-11g Release 2 client (Oracle Database 11g Release or Oracle Database 10g Rel. 2, or older) you will not fully benefit from the advantages of SCAN.
Reason: The Oracle Client will not be able to handle a set of three IPs returned by the DNS for SCAN. Hence, it will try to connect to only the first address returned in the list and will more or less ignore the others. If the SCAN Listener listening on this specific IP is not available or the IP itself is not available, the connection will fail. In order to ensure load balancing and connection failover with pre-11g Release 2 clients, you will need to change the TNSNAMES.ora of the client so that it would use 3 address lines, where each address line resolves to one of the SCAN VIPs.
sales.example.com =(DESCRIPTION=
 (ADDRESS_LIST= (LOAD_BALANCE=on)(FAILOVER=ON)
 (ADDRESS=(PROTOCOL=tcp)(HOST=133.22.67.192)(PORT=1521))
 (ADDRESS=(PROTOCOL=tcp)(HOST=133.22.67.193)(PORT=1521))
 (ADDRESS=(PROTOCOL=tcp)(HOST=133.22.67.194)(PORT=1521)))
 (CONNECT_DATA=(SERVICE_NAME= salesservice.example.com)))
Example 17: TNSNAMES.ora for Oracle Database pre- 11g Release 2 Clients
Miscellaneous SCAN-related Configurations
SCAN can be used in multiple configurations. This paper describes the recommended setup, which does not exclude other configurations, as long as you are aware of their implications. The following section discuss some less-common, configurations and will be updated over time as needed.
Using SCAN with Multiple Ports on the Same Subnet
For the purpose of allowing applications to maintain a distinguishable connect string on host / port level using one SCAN as the host or to enable port-based firewall configurations, SCAN can be set up to support more than one port for the same subnet. It needs to be noticed that different ports are only used for an initial connect. Once a connection using SCAN on any SCAN port has been established, port assignment is not maintained and routing of connections within the Oracle RAC cluster is performed using database services registered with one or more local listeners.
This means that all SCAN ports are treated the same, so that a connection that comes in on any SCAN port can be directed to any registered local listener on any port within the same subnet.
Note also that the multi-port assignment differs per version. Oracle Grid Infrastructure 11.2.0.3 would not let you set up multiple ports on one SCAN anymore, while Oracle Grid Infrastructure 11.2.0.2 would have let you use this configuration. Support for this configuration is resumed with Oracle Grid Infrastructure 11.2.0.3.6 and higher as well as Oracle Grid Infrastructure 12c.
Using SCAN in a MAA Environment not using Global Data Services
If you have implemented a Maximum Availability Architecture (MAA) environment without Global Data Services (GDS), a new capability available with Oracle Database 12c that extends intelligent load balancing and client failover concepts to globally distributed environments, in which you use Oracle RAC for both your primary and standby database (in both, your primary and standby site), which are synchronized using Oracle Data Guard, using SCAN provides a simplified TNSNAMES configuration that a client can use to connect to the database independently of whether the primary or standby database is the currently active (primary) database.
In order to use this simplified configuration, Oracle Database 11g Release 2 introduces two new SQL*Net parameters that can be used on for connection strings of individual clients. The first parameter is CONNECT_TIMEOUT. It specifies the timeout duration (in seconds) for a client to establish an Oracle Net connection to an Oracle database. This parameter overrides SQLNET.OUTBOUT_CONNECT_TIMEOUT in the SQLNET.ORA. The second parameter is RETRY_COUNT and it specifies the number of times an ADDRESS_LIST is traversed before the connection attempt is terminated.
Using these two parameters, both, the SCAN on the primary site and the standby site, can be used in the client connection strings. Even, if the randomly selected address points to the site that is not currently active, the timeout will allow the connection request to failover before the client has waited unreasonably long (the default timeout depending on the operating system can be as long as 10 minutes).
sales.example.com =(DESCRIPTION= (CONNECT_TIMEOUT=10)(RETRY_COUNT=3)
 (ADDRESS_LIST= (LOAD_BALANCE=on)(FAILOVER=ON)
 (ADDRESS=(PROTOCOL=tcp)(HOST=sales1-scan)(PORT=1521))
 (ADDRESS=(PROTOCOL=tcp)(HOST=sales2-scan)(PORT=1521)))
 (CONNECT_DATA=(SERVICE_NAME= salesservice.example.com)))
Example 18: TNSNAMES.ORA entry for MAA environment
Using SCAN with Oracle Connection Manager
If you use Oracle Connection Manager (CMAN) with your Oracle RAC Database, the REMOTE_LISTENER parameter for the Oracle RAC instances should include the CMAN server so that the CMAN server will receive load balancing related information and can therefore load balance connections across the available instances.
The easiest way to achieve this would be to add the CMAN-server as an entry to the REMOTE_LISTENER of the databases that clients want to connect to via CMAN as shown in figure 10. Note also that you will have to remove the SCAN from the TNSNAMES connect descriptor of the clients and further configurations will be required for the CMAN server. See the CMAN documentation for more details.
SQL> show parameters listener
 NAME                       TYPE        VALUE
 -------------------------- ----------- ------------------------------
 listener_networks          string
 local_listener             string      (DESCRIPTION=(ADDRESS_LIST=
 (ADDRESS=(PROTOCOL=TCP)
 (HOST=148.87.58.109)(PORT=1521))))
 remote_listener            string       stscan3.oracle.com:1521,(DESCRIPTION=
 (ADDRESS_LIST=(ADDRESS=(PROTOCOL=TCP)
 (HOST=CMANserver)(PORT=1521))))
Example 19: Server side TNSNAMES.ora example entry when using CMAN
Summary and Conclusion
Single Client Access Name (SCAN) is a feature used in Oracle Real Application Clusters environments that provides a single name for clients to access any Oracle Database running in a cluster. SCAN was first introduced with Oracle Real Application Clusters (RAC) 11g Release 2 as part of the Oracle Grid Infrastructure suite of products and was further enhanced with Oracle RAC 12c. In any version, having a single name to access the cluster to connect to a database in this cluster allows clients to use EZConnect and the simple JDBC thin URL to access any database running in the cluster, independently of the number of databases or servers running in the cluster and regardless on which server(s) in the cluster the requested database is actually active. Support for multiple subnets in the cluster as well as IPv6 support in addition to a more secure way of registering database instances with SCAN listeners floating in the cluster make the latest version of SCAN more flexible and effective in order to support DBaaS or private database cloud deployments.
From Oracle Database 11g Release 2 onwards Oracle enhanced the administration as well as availability of database from client’s perspective, load balancing by introducing SCAN (Single Client Access Name). With SCAN, clients could use SCAN Name (resolved by 3 VIPs, for default configuration) rather than list of all RAC nodes in connect string. By default SCAN listeners (defined on SCAN VIPs) created as first point which co-ordinate with Node Listeners (defined on Node VIPs), so even if failure of Node SCAN Listener running on that node (if any) would be relocated to any surviving node while available SCAN Listeners would be serving as normal.
=========================================
Solve if Oracle Connection Fails? Contact to Remote DBA Service to handle it
ReplyDeleteThe affiliation fail issue is generally looked by a few of customers and due to nonattendance of specific aptitudes they are not prepared to correct it. Regardless, don't worry, with Cognegic's Database Administration for Oracle or Online Oracle DB Support you can supportively recognize the clarification behind affiliation disillusionment and get the very course of action. Beside affiliation issue we moreover lessen outrageous CPU usage and question execution time and examine an extensive variety of specific missteps.
For More Info: https://cognegicsystems.com/
Contact Number: 1-800-450-8670
Email Address- info@cognegicsystems.com
Company’s Address- 507 Copper Square Drive Bethel Connecticut (USA) 06801